(916) 308-3856

📌Key Takeaways
A quick spray-pattern check tells you whether to clean or replace a clogged misting nozzle—and replacement often wins.
-
Spray Pattern Is Your Answer: If the mist looks uneven or lopsided after cleaning, the nozzle opening is worn out and no chemical will fix it.
-
Replace When In Doubt: A $3 nozzle costs less than 17 minutes of labor to clean—swap first, troubleshoot later.
-
Never Poke the Opening: Using pins or wires damages the tiny hole permanently, turning a cleanable clog into a must-replace situation.
-
Filter for Prevention:Sediment filters catch dirt but not calcium—hard water areas need phosphate treatment to stop scale buildup at the source.
-
Check the System, Not Just the Nozzle: Dripping can come from low mounting, oversized openings, or too many nozzles for your pump's pressure.
Fast decisions protect your margin and your reputation.
Misting system installers and service contractors will find clear diagnostic steps here, preparing them for the detailed cleaning and prevention workflow that follows.
~ ~ ~ ~ ~ ~ ~ ~ ~ ~ ~ ~ ~ ~ ~ ~ ~ ~ ~ ~ ~ ~ ~ ~ ~ ~ ~ ~ ~ ~ ~ ~ ~ ~ ~ ~ ~ ~ ~ ~ ~ ~ ~ ~ ~ ~ ~ ~ ~ ~ ~ ~ ~ ~
Saturday night. The patio is packed. Your phone lights up—the client's misting line is dripping onto guests mid-dinner service.
You've seen this before. The nozzle throws an uneven fan of mist instead of a clean, consistent plume. Someone's going to ask you to fix it, and the question hits: Is this worth cleaning, or do I just swap it out?
If a nozzle is clogged with mineral scale, a professional descaler can restore flow. But if the orifice is worn, no chemical will bring the spray pattern back. This guide shows a fast way to decide when a cleaning attempt makes sense—and when replacement is the smarter, more profitable fix.
The 30-Second Decision: Clean or Replace?
Before you pull out tools or chemicals, run through this quick diagnostic:
Try cleaning when:
-
Output is reduced but the spray pattern shape looks normal
-
You see visible white mineral buildup on the nozzle exterior
-
The system is relatively new and hasn't had repeated issues
-
This is the first time you've noticed a problem with this specific nozzle
Replace immediately when:
-
The spray pattern stays distorted or uneven after cleaning
-
You've already cleaned this nozzle twice
-
The nozzle drips persistently even after descaling
-
You're on a service call and the client is waiting
The logic is simple. Cleaning dissolves mineral scale. It does nothing for a worn orifice. If the problem is physical damage to the nozzle's tiny opening, you're burning labor hours on a fix that won't stick.
For contractors, this decision protects both margin and reputation. A callback costs more than a $3 nozzle ever will.
Diagnose the Root Cause: Clog vs. Wear vs. Conditions
Not every spray problem is a nozzle problem. Before you start troubleshooting the hardware, rule out the environment.

Signs pointing to clogging:
-
Reduced water output (weak mist or partial spray)
-
Intermittent misting—works, then sputters, then works again
-
White or tan mineral deposits visible around the orifice
-
Problem appeared gradually over weeks of operation
Signs pointing to wear:
-
Spray pattern is distorted, lopsided, or fan-shaped when it should be conical
-
Uneven mist distribution even after you've cleaned the nozzle
-
Persistent dripping that doesn't stop when the system cycles off
-
The nozzle has been in service for multiple seasons
Signs the nozzle isn't the problem:
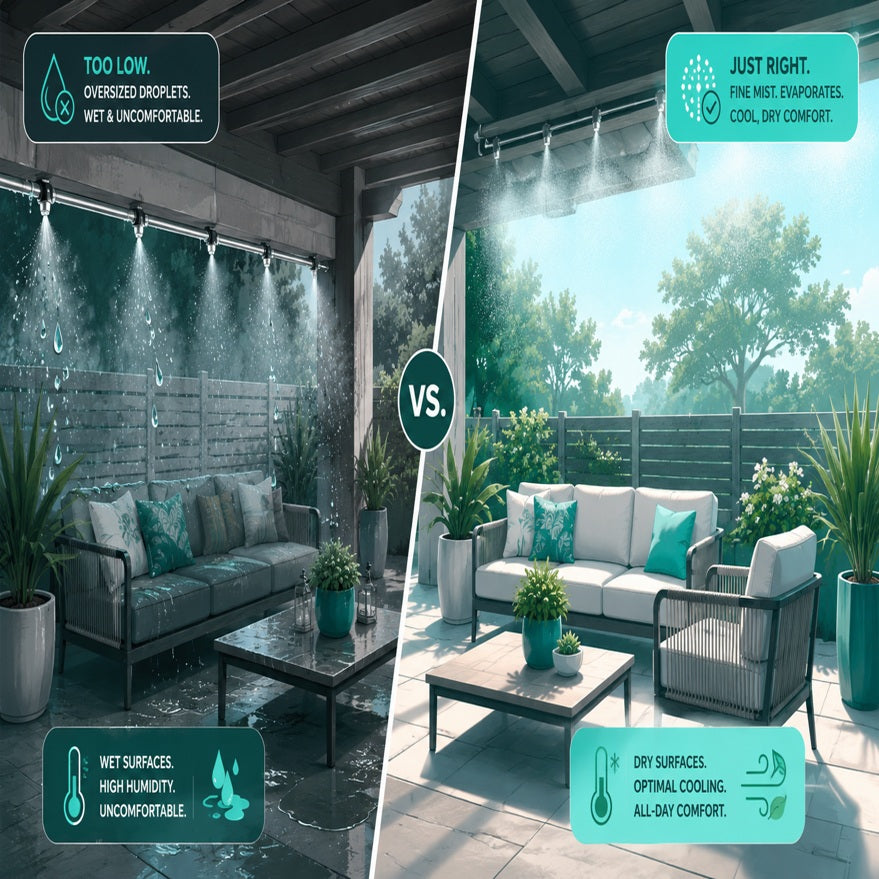
Sometimes dripping or wetting has nothing to do with the nozzle itself. Before you swap parts, check these four causes:
-
Temperature and humidity: If conditions are too cool or too humid, mist won't evaporate before it reaches surfaces
-
Mounting height: Nozzles mounted too low don't give droplets enough airtime to evaporate
-
Nozzle size: An orifice that's too large for the climate produces droplets that are too heavy
-
Pump mismatch: Too many nozzles for the pump's capacity drops system pressure, creating larger droplets
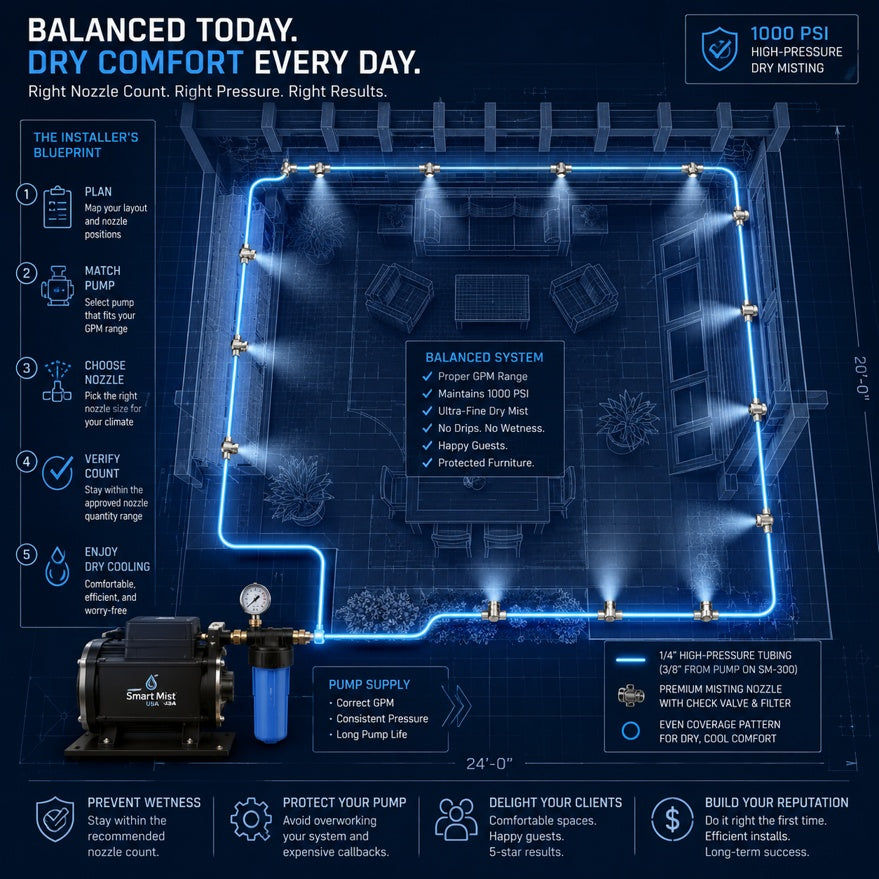
One more diagnostic note: standard nozzle spacing runs 24 to 30 inches apart. Closer isn't better—when nozzles are packed too tight, droplets combine into larger drops that won't evaporate properly. If you're using stainless tubing, spacing may already be preset at 24 inches. For help matching nozzle count to pump capacity, see the Nozzle Size & Quantity Chart or the guide on Balancing Your Pump and Nozzles.
Cleaning Workflow: When It's Worth Trying
Treat cleaning as a controlled pass/fail test, not a forever project. If your diagnosis points to clogging, here's how to run that test.

Step 1: Power down and depressurize. Shut off the pump and release system pressure before removing any nozzles. Safety first.
Step 2:Remove the nozzle and rinse. Unscrew the nozzle carefully. Rinse it under clean water to flush loose debris. Never poke the orifice with a pin, wire, or tool—you'll damage the precision opening and guarantee a replacement.
Step 3: Soak in a professional descaler. Use a calcium and lime remover like CLR, following the product's label directions. A 15 to 30 minute soak typically handles mineral scale. Avoid vinegar—it's too weak for professional-grade buildup and wastes your time.
For safe handling, review the manufacturer's safety data sheet before using any acid-based cleaner. Wear gloves and eye protection. Never mix descalers with other chemicals.
Step 4: Rinse thoroughly and reinstall. Flush the nozzle with clean water to remove all descaler residue. Reinstall and tighten snugly—don't overtighten.
Step 5: Test and make the call. Power on the system and observe the spray pattern. If it's clean and consistent, the fix worked. If the pattern is still irregular, distorted, or dripping—the nozzle is trash. Replace it.
Always use clean water sources. Well water, river water, or other dirty sources accelerate nozzle blockage and shorten pump life. If your water source is questionable, consider an upgraded sediment filter.
When Replacement Is the Smarter Move
Replacement is faster, more repeatable, and reduces callbacks. Cleaning has its place, but the math often favors swapping the part.
Say a cleaning cycle takes 17 minutes per nozzle: removal, soak time, rinse, reinstall, test. At a labor rate of $75 per hour, that's roughly $21 in labor. A replacement nozzle costs $2 to $5.
If there's any doubt about whether cleaning will work, replacement wins. Every time.
The professional's approach:
-
Keep spare nozzles on the truck. Swap first, troubleshoot later.
-
Treat cleaning as bench work back at the shop—not on-site heroics when labor is billable.
-
On service calls, replace the nozzle, restore the spray pattern, and move on.
Warranty reality check: Nozzles are consumable items and aren't covered under warranty. Clogged nozzles are not considered defects—they're a maintenance issue. Hard water damage isn't covered either. This is normal for precision components that operate in harsh outdoor conditions. A replace-first service strategy also keeps you out of warranty disputes with clients who expect miracles from a $3 part.
The faster you make the "clean vs. replace" call, the faster you restore performance and protect your margin.
Prevent Clogs So You Clean Less
The real win isn't getting better at fixing nozzle problems. It's having fewer nozzle problems to fix.
Test your water hardness.
Water hardness measures dissolved calcium and magnesium. The USGS defines hard water as 121–180 mg/L, and very hard water as anything above 180 mg/L. If you're installing systems in hard or very hard water areas, clogs will recur unless you address the source.
Understand the difference between sediment and hard water filtration.
This distinction matters. Sediment filters—like the stainless steel mesh filter included with high-pressure misting systems—catch particles like dirt and debris. They protect nozzles and pump valves from physical blockage. They're essential, but they won't stop calcium.
Calcium flows right through a sediment filter. It builds up gradually inside the pump internals and nozzles until you have a problem. By then, you're replacing parts.
For hard water areas, you need phosphate treatment. Phosphate filters use slow-dissolving crystal beads to treat the water chemically, preventing scale from forming. Smart Mist USA offers filtration options including single and dual canister configurations for both sediment and phosphate treatment. An optional advanced canister filter with a 5-micron cartridge can help capture very fine particles that standard mesh filters miss.
No filter setup is guaranteed to prevent every water-related issue—but proper filtration dramatically reduces clog frequency and extends equipment life. For more detail, see the Hard Water Management guide or the Knowledge Center filtration overview.
Flush lines before installing nozzles.
A simple habit that prevents debris clogs: before screwing in nozzles on a new install, open the water supply and let it run through the lines for a few minutes. This flushes out any particles left over from manufacturing or installation. Most "brand-new nozzle problems" are actually debris that never should have made it to the orifice. Once the water runs clear, install your nozzles.
Register your system. Systems must be registered on the Smart Mist USA website to activate warranty coverage.
Frequently Asked Questions
Can I use vinegar to clean misting nozzles?
Vinegar is too weak for professional-grade calcium buildup. It might work for light residential deposits, but for installers dealing with hard water scale on commercial systems, it wastes time. Use a professional descaler like CLR, following the label directions and safety data sheet for handling precautions.
How do I know if my nozzle is worn out?
The spray pattern tells you everything. A worn nozzle produces a distorted or uneven spray pattern even after cleaning. If you've descaled a nozzle and the pattern is still asymmetrical, flattened out, or persistently dripping—the orifice is compromised. Replace it.
How often should nozzles be cleaned or replaced?
Frequency depends on water quality. In areas with hard water, inspect nozzles weekly during heavy use seasons. With proper phosphate filtration ahead of the high-pressure mist pump, many installers go an entire season without nozzle issues. Without filtration, expect to replace nozzles multiple times per year. A practical rule: clean only when clogging is likely and the test is fast; otherwise replace to avoid repeat callbacks.
Why is my system dripping even with clean nozzles?
Dripping isn't always a nozzle problem. Check these four causes: temperatures too low or humidity too high for proper evaporation, nozzles mounted too low, nozzle orifice size too large for the climate, or too many nozzles for your pump's capacity (which drops pressure and creates larger droplets). Also verify nozzle spacing is 24 to 30 inches—closer spacing causes droplets to combine.
What's the safest way to use a descaler?
Follow the product label exactly. Wear chemical-resistant gloves and eye protection. Work in a ventilated area. Never mix descalers with bleach or other cleaning chemicals. Rinse nozzles thoroughly after soaking to remove all residue before reinstalling. Always strictly adhere to the chemical's safety guidelines.
Your Next Step
Get the free installation planning guide for summer cooling tips and system design best practices. For additional resources, explore the Installation Guides library. If you're troubleshooting a persistent issue, start with Contact or Request a Repair.
Disclaimer:This content is for informational purposes and should not replace professional advice. Always follow manufacturer guidelines and safety data sheets when handling chemical descalers.
Our expert team uses AI tools to help organize and structure our initial drafts. Every piece is then extensively rewritten, fact-checked, and enriched with first-hand insights and experiences by expert humans on our Insights Team to ensure accuracy and clarity.
About the Smart Mist USA Insights Team
The Smart Mist USA Insights Team is our dedicated engine for synthesizing complex topics into clear, helpful guides. While our content is thoroughly reviewed for clarity and accuracy, it is for informational purposes and should not replace professional advice.