(916) 308-3856
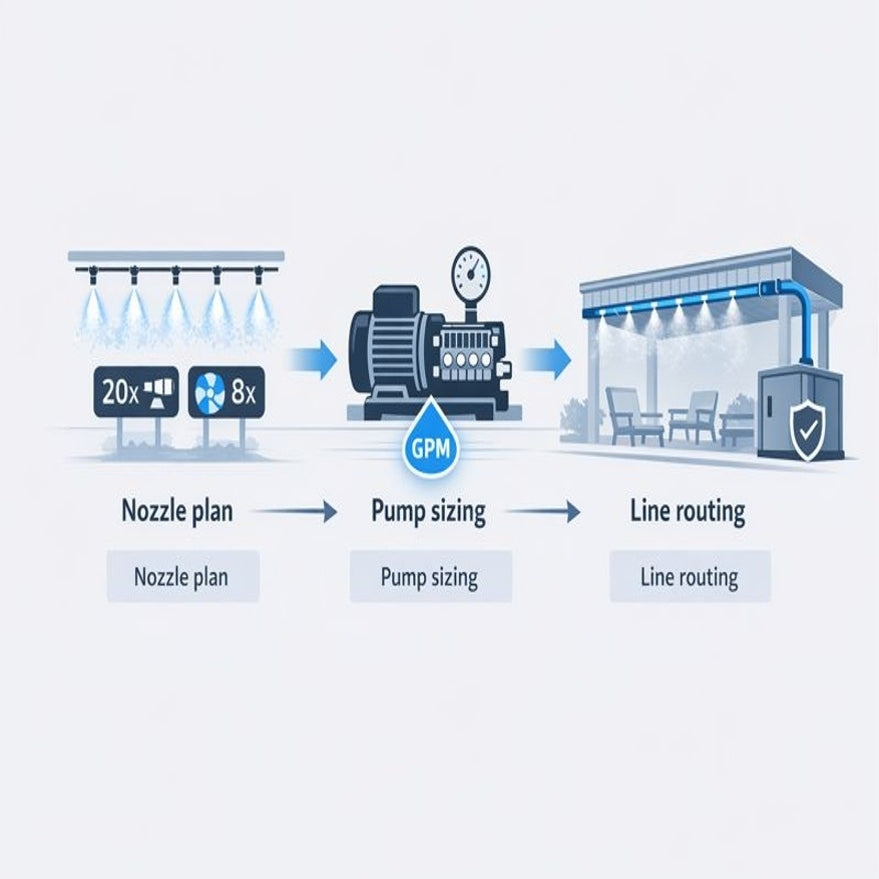

📌Key Takeaways
High-pressure misting systems deliver dry cooling only when pumps maintain 1000+ PSI at the nozzles—below that threshold, droplets wet surfaces instead of evaporating.
-
1000 PSI Is the Non-Negotiable Threshold: Pressures below 1000 PSI produce larger droplets that fall before evaporating, causing surface wetness instead of cooling.
-
Pump Size Is Fixed by Nozzle Demand: Flow requirements are determined by nozzle quantity and orifice size—pumps cannot be adjusted later without system redesign.
-
Remote Placement Extends Equipment Life: Mounting pumps 15+ feet from guest areas in ventilated, accessible locations prevents noise complaints and simplifies maintenance.
-
Four Wetness Causes Have Clear Fixes: High humidity, low mounting height, oversized nozzles, or pump capacity mismatch each require specific diagnostic corrections.
-
Hard Water Destroys Pumps Without Proper Filtration: Commercial-grade descaling solutions compatible with seal materials prevent calcium buildup that causes premature pump failure.
Correct pressure plus matched capacity equals years of callback-free operation.
Contractors specifying commercial misting installations will gain a systematic framework for avoiding common installation failures, preparing them for the technical sizing and placement details that follow.
The pump is where your reputation starts—or where it falls apart.
You've seen the callback: misted patio furniture dripping wet, poolside cushions soaked through, and a frustrated client pointing at the ceiling-mounted fans you installed three weeks ago. The system is running exactly as designed. The problem? It was never designed to keep things dry.
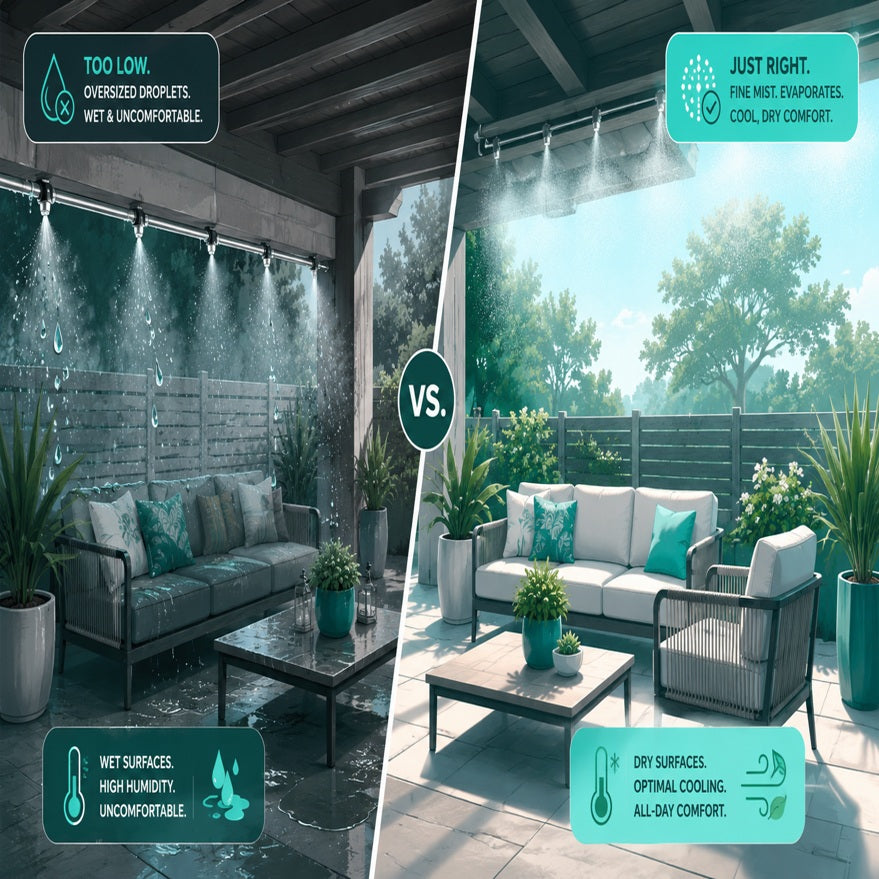
This is the gap most contractors miss. High-pressure mist pumps aren't just "better sprinklers." They're the difference between flash evaporation—which cools the air before a droplet ever reaches a surface—and a fine spray that wets everything it touches. That threshold sits at 1000 PSI. Below it, you're installing a liability. Above it, you're engineering climate control.
This guide walks you through what a high-pressure mist pump actually does, how to size it without the guesswork, and how to avoid the four wetness causes that trip up most installations. You'll understand why the pump sits remotely, how filtration protects your investment, and when app-controlled or commercial-grade systems make sense for your project.
By the end, you'll have a practical framework for specifying pumps that deliver dry cooling—and protect the reputation you've built project by project.
What a High-Pressure Mist Pump Actually Does
A high-pressure mist pump pressurizes water to 1000+ PSI, transforming it into ultra-fine droplets that evaporate before they reach any surface. This is the engine that makes dry cooling possible.

Physics is straightforward. At 1000 PSI or higher, water exits the nozzle in droplets so small—typically measured in microns—that they flash-evaporate in mid-air. The result is a cooling fog that can drop ambient temperature by up to 25 degrees in ideal arid conditions, driven entirely by the evaporation efficiency. At lower pressures, the droplets are larger, heavier, and fall before they can evaporate. That's when you get spray instead of fog.
A practical way to understand the pressure tiers:
-
High-pressure (1000+ PSI): Fine mist producing optimal evaporative cooling without wetting
-
Mid-pressure (200–300 PSI): Better evaporative cooling than low-pressure systems but will still cause wetting
-
Low-pressure (30–40 PSI): Larger droplets that will cause wetting
Think of it as the difference between steam rising from a hot surface and water dripping from a showerhead. The first is a phase change happening in the air. The second is just water falling. Anything less than 1000 PSI isn't cooling; it's just getting things wet.
The pump itself is a compact, externally mounted unit—typically placed in a mechanical room, behind a bar, or inside a weatherproof enclosure away from guest areas. It connects to a standard water supply, pressurizes the flow, and sends it through a dedicated high-pressure line to the cooling endpoints: either perimeter nozzles mounted along a structure or delivery manifolds integrated into misting fans. The pump doesn't sit inside the fan. It feeds the system from a remote location, which gives you control over noise, service access, and system longevity.
This separation is critical. It allows you to place the pump where it can be maintained without disrupting the guest experience, route lines cleanly through ceilings or behind structures, and size the system based on nozzle demand rather than cramming components into a single device.
Flash Evaporation Explained in Contractor Terms
Flash evaporation refers to the rapid phase change that occurs when water pressurized to 1000+ PSI is forced through a micro-orifice. Upon exiting the nozzle, the sudden pressure drop shears the water into micron-sized droplets that absorb heat and convert to vapor almost instantly. This phase change—liquid to gas—pulls heat out of the air, lowering the temperature depending on temperature and humidity conditions.
The process works best in hot, dry climates where the air has room to absorb moisture. In these conditions, evaporation happens almost instantly, and cooling is dramatic. In more humid environments, the air is already saturated with moisture, so evaporation slows. High-pressure systems still deliver effective cooling in humid regions, though the effect is less pronounced than in arid climates. This doesn't mean misting won't work in humid regions—it means system design (nozzle size, spacing, fan airflow) needs to account for the local climate. The basic physics are straightforward: drier climates experience more evaporation and therefore more cooling. Higher temperatures typically accelerate evaporation, while higher humidity slows it because the air is already holding more water vapor.
Here's the critical insight: evaporation speed is determined by the dryness of the air, not the size of the space. A patio in Phoenix will see faster evaporation and more cooling than the same patio in Miami, even if both systems are identical. The humidity level is the governing variable.
For contractors, this means two things. First, you need to explain to clients that cooling performance isn't a fixed number—it's a range that depends on local weather. Second, you need to design for the worst-case scenario (highest humidity day) to ensure the system doesn't wet surfaces when conditions are less favorable. That starts with maintaining 1000+ PSI at the nozzles and continues through proper nozzle sizing and pump capacity matching. For background on how evaporative cooling performance varies by climate, the U.S. Department of Energy provides detailed technical explanation.
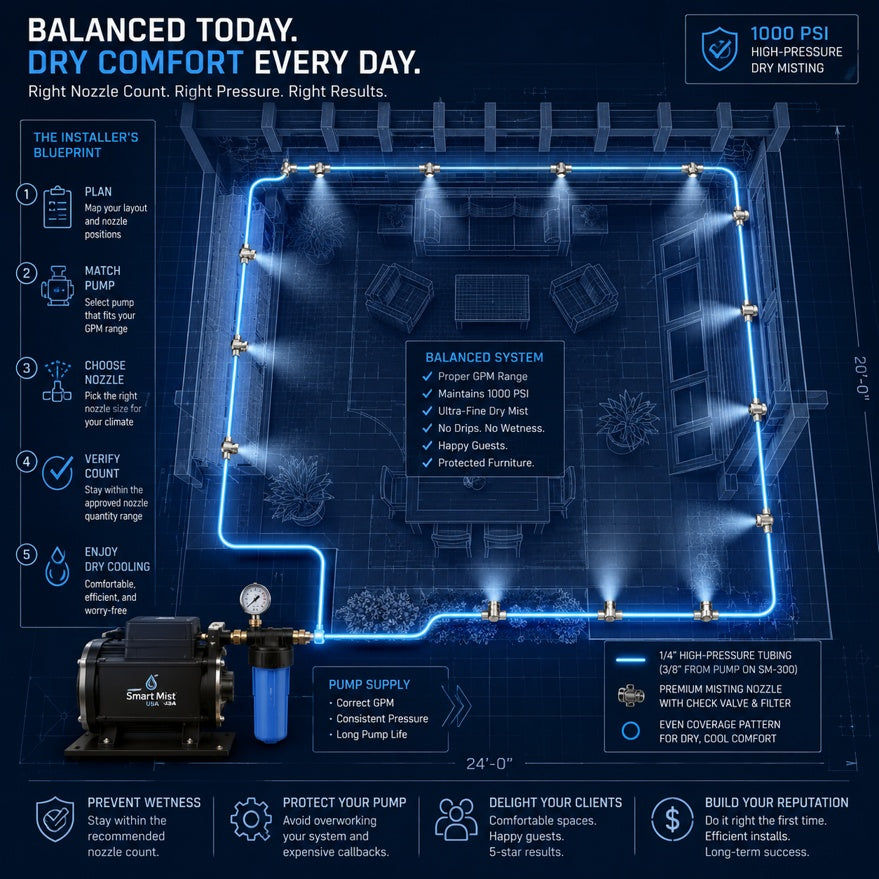
The Pro-Grade System Layout: Pump + High-Pressure Line + Nozzles
A professional misting system is built from three distinct components, not a single integrated unit. Understanding this separation is essential for correct specification and installation.
Component 1: The Cooling Endpoint. This is where the mist enters the space. It can be a series of perimeter nozzles mounted along a pergola, patio cover, or building fascia, or it can be delivery manifolds built into misting fans. The endpoint determines the coverage pattern, but it doesn't generate the pressure. That's the pump's job.
Component 2: The External Pump. This sits remotely—in a mechanical room, storage closet, outdoor enclosure, or behind a bar—away from the guest area. It pressurizes the water to 1000+ PSI and feeds the system. Keeping the pump external gives you flexibility in placement (for noise control and service access) and allows you to size the pump independently based on the total nozzle demand of the system, not the constraints of fitting it inside a fan housing.
Component 3: The High-Pressure Line. This is the connection between the pump and the endpoints. It's typically 3/8-inch nylon tubing rated for 1500+ PSI, run through walls, above ceilings, or buried underground. When routing high-pressure lines behind a ceiling or inside a wall, always use a protective sleeve—Pex or PVC works—to prevent abrasion and make future service easier. This sleeving is essential for maintaining system integrity and simplifying maintenance access. The line carries pressurized water from the pump to the nozzles, maintaining pressure loss within acceptable limits based on run length and elevation changes.
Why This Configuration Matters. Contractors sometimes assume a misting fan includes a built-in pump because that's how some consumer-grade products are sold. In professional installations, the pump is always separate. This allows you to place it where it won't be heard, service it without disrupting the space, and scale the system by adding more nozzles or fans without replacing the entire assembly. It also means you're not limited by the pump size that can physically fit inside a fan housing.
When you spec the system, start with the cooling endpoints (how many nozzles, what size, and where they'll be placed), then size the pump to match that demand, then design the line routing to minimize pressure loss. That sequence—endpoint first, pump second, line routing third—prevents the most common sizing mistakes.
Sizing Without the Headache: Match Pump Capacity to Nozzle Plan
Pump sizing isn't about turning a dial to increase pressure or flow. It's about selecting the correct pump size to match the total flow demand created by your nozzle plan. Flow is determined by nozzle size and nozzle quantity. Once you know those two variables, the pump size is fixed.
Here's the logic. Each nozzle orifice (measured in thousandths of an inch—like .008", .012", or .016") has a specific flow rate at 1000 PSI. Multiply the flow rate of one nozzle by the total number of nozzles, and you get the system's total GPM (gallons per minute) demand. The pump you choose must be capable of delivering that flow at the required pressure. If the pump is undersized, pressure drops below 1000 PSI, droplets get larger, and the system starts wetting surfaces.
For example, if your design calls for 40 nozzles at .012" orifice size, each flowing approximately 0.045 GPM, your total demand is 1.8 GPM. You'd select a pump rated for at least 2 GPM at 1000 PSI. If you try to add more nozzles to that system later without upgrading the pump, you've exceeded capacity, and pressure will fall.
Different applications require different pump sizes. A small patio with 20 nozzles needs a smaller pump than a restaurant patio with 80 nozzles. If a client wants to expand coverage later, you'll need to either add a second pump or upgrade to a larger model. When discussing customization during initial setup, focus on the two parameters that determine nozzle size selection: climate (humidity) and mounting height of the nozzles. These factors guide your nozzle choices, which in turn determine the pump size needed.
The easiest way to avoid sizing errors is to use the Nozzle Size & Quantity Chart. It maps nozzle configurations to pump capacity, eliminating guesswork. Layout your coverage pattern, count your nozzles, confirm the orifice size, and match it to the chart. That's the spec.
Placement, Protection, and Longevity
Where you place the pump determines how long it lasts, how often you'll be called back for service, and whether your client will hear it running during dinner service.

Noise Separation. Pumps generate sound—typically in the range of 55 to 70 decibels depending on size and model. That's comparable to a normal conversation or a window air conditioner. It's not loud, but it's audible if the pump is mounted three feet from where guests are sitting. Place it in a mechanical room, behind a bar, inside a storage closet, or in a weatherproof enclosure at least 15 to 20 feet from the primary seating area. If the space doesn't allow for that kind of separation, plan for an enclosure with sound-dampening features.
Ventilation and Heat. Pumps generate heat during operation. If you place one in a sealed box or a closet with no airflow, it will overheat and shut down on a 105-degree afternoon when your client needs it most. Enclosures need ventilation—louvered panels, mesh openings, or active airflow from a small fan. If the pump is installed outdoors, use a weatherproof enclosure rated for the local climate, but make sure it's not airtight.
Service Access. Pumps require occasional maintenance—filter changes, nozzle cleaning, and seal inspection. If you mount the pump behind a locked panel that requires removing cabinetry to access, you've just guaranteed a service call will take twice as long and cost more than it should. Plan for clear access: a hinged door, a removable panel, or a dedicated utility space where a technician can reach the pump, water supply, and electrical disconnect without disassembling half the patio.
Operational Safety. Never run the pump dry, even briefly. Running without water flow damages seals and internal components. Ensure the water supply is active before energizing the pump and consider installing a flow switch or pressure sensor if the system will run unattended.
Enclosure Options. If the pump must be placed outdoors, a proper enclosure protects it from UV exposure, rain, debris, and theft. Look for enclosures with lockable doors, integrated ventilation, and space for the pump, electrical components, and a basic sediment filter. Avoid burying the pump in an underground vault unless you're prepared to deal with moisture intrusion, insect nests, and difficult maintenance access.
Remote placement isn't just about convenience—it's about designing for the long term. A pump that's easy to access, well-ventilated, and isolated from guest areas will run reliably for years. One that's crammed into a corner with no airflow will fail during your busiest season.
Filtration and Water Quality: The Pump-Killer Most Installs Miss
Most contractors focus on nozzles clogging. That's a real problem, but it's not the only one. Calcium buildup inside the pump itself damages seals, valves, and internal components—and once that damage is done, you're replacing parts or replacing the pump.
There are two filtration issues to address: sediment and hard water.
Sediment Filtration. This is basic protection against dirt, rust, and debris in the water supply. A standard 50-micron sediment filter installed at the pump inlet will catch most particulates before they reach the nozzles or the pump's internal components. This is non-negotiable. Without it, you'll spend more time cleaning clogged nozzles than you will servicing clients. Change the filter element every season or more frequently if the local water supply is particularly dirty.
Hard Water Mitigation. This is the more serious issue, and it's the one most contractors overlook. Hard water contains dissolved calcium and magnesium. When pressurized and atomized through nozzles, these minerals leave deposits inside the pump housing, on seals, and across nozzle orifices. Over time, calcium buildup reduces flow, increases wear, and causes premature pump failure alongside nozzle performance issues.
If you're installing in a region with hard water, a basic sediment filter won't help. You need specialized filtration or treatment—reverse osmosis systems, water softeners, or inline descalers depending on budget and system size. For existing systems already experiencing buildup, use a commercial-grade descaling solution (such as CLR, provided it is compatible with your pump's seal material) to dissolve deposits. Household vinegar is typically too weak to remove hardened scale inside high-pressure components. Flush the system with descaling solution according to the product instructions, then rinse thoroughly before returning the system to service. For clogged nozzles, you can clean them with descaling solution or replace them depending on the severity of the buildup.
Here's the reality. Filtration isn't glamorous, and clients won't see it. But it's the difference between a system that runs for five years with minimal service and one that needs a pump rebuild after 18 months. Build the cost of proper filtration into every proposal, explain the tradeoffs clearly, and document it in your install notes. When the system is still running flawlessly three years later, you won't get a callback—you'll get a referral.
Why Systems Get Things Wet and How to Fix It
When a misting system wets surfaces, there are only four possible causes. Here's each one with the practical fix.
Cause 1: Temperatures Too Low and/or Humidity Too High for Efficient Evaporation. Mist cools by evaporation, and evaporation slows when the air is already saturated with moisture. On a 90-degree day with 80% humidity, even a perfectly functioning system will struggle to evaporate every droplet before it falls. The mist isn't defective—the climate just isn't optimal for flash evaporation.
Fix: Set client expectations during the design phase. Explain that misting works best in hot, dry conditions, and that humid environments will see reduced cooling and occasional surface wetness. If the client is in a high-humidity region, consider larger nozzle spacing, higher mounting heights, or supplemental airflow from fans to help disperse the mist before it can settle. Use interval strategies—spray for 30 seconds, pause for two minutes, repeat—to match conditions and avoid oversaturating the air. This approach maintains comfort without accumulating airborne moisture that eventually lands on surfaces.
Cause 2: Fan Mounted Too Low. When a misting fan is mounted at six feet or lower, the mist doesn't have enough time to evaporate before reaching the ground or furniture. The closer the nozzles are to surfaces, the more likely droplets will land before turning to vapor.
Fix: Mount fans around 10 feet above the ground or seating area. This gives the mist time to disperse and evaporate in the airflow. If mounting height is constrained by the structure, reduce the nozzle count or use smaller orifice sizes to lower the total mist volume.
Cause 3: Nozzle Size Too Large. A .016" nozzle flows more water than a .008" nozzle. If the orifice is too large for the application, you're introducing more mist than the air can evaporate, even if pressure is correct. Larger nozzles are appropriate for wide-open spaces with strong airflow, but they'll cause wetting in enclosed patios or low-ceiling areas.
Fix: Use the smallest nozzle size that provides adequate coverage. For most residential and light commercial applications, .008" to .012" orifices are the sweet spot. Reserve larger sizes for high-airflow environments like loading docks, outdoor event spaces, or agricultural cooling.
Cause 4: Number/Size of Nozzles Too Large for the Pump, Resulting in Low Pressure. If you've added too many nozzles or orifices that are too large for the pump's capacity, system pressure drops below 1000 PSI. When pressure falls, droplet size increases, and the mist becomes a spray. This is the most common cause of wetting in systems that were working fine initially but started having problems after expansion.
Fix: Match the nozzle plan to the pump capacity from the start using the Nozzle Size & Quantity Chart. If you need to add coverage later, either add a second pump to handle the additional load or upgrade to a larger model. Do not exceed the pump's rated capacity.
The Diagnostic Sequence. When you get a wetness complaint, check in this order: (1) Is it humid or cool outside? (2) Are the fans mounted high enough? (3) Are the nozzles the correct size? (4) Does the nozzle count exceed the pump's capacity? Walk through these four checks, and you'll identify the issue in under ten minutes.
Where App-Controlled and Commercial Pumps Fit
Not every project needs remote control or continuous-duty components, but when the application calls for it, these features solve specific problems.
Our App-Controlled Pumps. These models allow the client to control the system from a smartphone—turning it on or off, setting spray intervals (mist for 30 seconds, pause for two minutes, repeat), and programming schedules so the system activates automatically during peak heat hours. The key here is understanding what's being controlled: on/off switching, timing, and intervals.
Flow is determined by the nozzles you've selected during initial setup based on climate (humidity) and mounting height. App control simply automates when the pump runs and for how long. This is useful for residential clients who want to cool the patio before guests arrive or for light commercial spaces like bars and restaurants where manual operation isn't practical. It's not a feature that improves cooling performance—it's a convenience layer that allows hosts and business owners to focus on guests rather than managing cooling equipment.
Before finalizing the pump location for our app-controlled models, perform a range check and a quick on/off test to confirm reliable control at the intended mounting spot. This prevents connectivity issues after installation is complete.
Our Line of Commercial Pumps. These are designed for continuous-duty operation in high-demand environments like restaurant patios, event venues, or theme parks where the system runs all day, every day. Our commercial-grade pumps typically have larger motors, industrial-rated seals, and higher MTBF (mean time between failures). Some advanced models use variable frequency drives (VFDs) to enable zoned control—activating specific sections of nozzles based on occupancy or weather conditions—but this is still accomplished through switching and sequencing.
When to Recommend Each. For residential projects and small commercial patios (under 1,000 square feet), our line of high-pressure misting pumps with manual or timer-based controls are sufficient. For larger venues, extended run times, or clients who want smartphone integration, our app-controlled models make sense. For high-traffic commercial installations like bars and restaurants where reliability and uptime are critical, spec our commercial high-pressure misting pumps from the start.
Contractor Checklist: Specifying a Pump That Protects Your Reputation
Before you finalize the spec, run through this checklist to confirm the system is designed for long-term performance and low callback risk.
-
1000+ PSI standard verified. Confirm the pump is rated for at least 1000 PSI at the nozzles. Anything lower will cause wetting and reduce cooling performance.
-
Nozzle plan matched to pump capacity. Use the Nozzle Size & Quantity Chart to confirm the pump can deliver adequate flow for the nozzle count and orifice sizes in your design.
-
Filtration included. Install a sediment filter at the pump inlet. If the water supply is hard, discuss specialized filtration options with the client and document the recommendation.
-
Remote placement planned for noise and service access. Identify a location at least 15 feet from guest areas with ventilation and clear access for maintenance.
-
Troubleshooting plan for wetness is understood. Confirm you can walk the client through the four causes of wetting and explain the fixes if they call with concerns.
This checklist isn't just for your protection—it's a tool for client education. Walk through it during the proposal phase, explain why each item matters, and document the decisions in writing. When the system is still running perfectly two years later, that checklist becomes the proof that the design was sound from day one.
Get Your FREE Installation Planning Guide
Next Steps
If you're spec'ing a system for the first time, start with the Nozzle Size & Quantity Chart to map nozzle configurations to pump capacity. For step-by-step guidance on running lines and mounting nozzles, review the Installation Guides. And if you want to understand the physics behind why 1000 PSI makes the difference, the Flash Evaporation blog post breaks it down in plain language.
For deeper guidance on layout decisions, read Perimeter Misting vs. Misting Fans: Choosing the Right Layout for Your Venue. To understand the long-term cost implications of system choices, explore Beyond Price: A Framework for Evaluating Total Cost of Ownership in Commercial Misting Systems.
For project planning resources and deeper technical guidance, explore the Knowledge Center.
If you only remember one thing: The pump is the system. Everything else—nozzles, fans, controls—depends on it delivering 1000+ PSI consistently. Spec it right, place it smart, and protect it with filtration. That's the foundation of dry cooling.
This guide is intended as a comprehensive starting point. For decisions specific to your unique situation, we always recommend consulting a qualified professional.
Disclaimer: This guide provides general educational information about high-pressure misting system design and installation. For site-specific recommendations, consult a qualified contractor or installation professional.
Our Editorial Process
We build our guides from internal product documentation, installation guidance, and customer feedback to keep recommendations practical and field-ready. When product options differ, we explain the tradeoffs in plain language and link to the most relevant setup resources so you can act immediately.
About the Smart Mist USA Insights Team
The Smart Mist USA Insights Team is our dedicated engine for synthesizing complex topics into clear, helpful guides. While our content is thoroughly reviewed for clarity and accuracy, it is for informational purposes and should not replace professional advice.